How to Take a Passport Photo With Your Phone

Yes — you can take a passport-style photo with an iPhone or Android phone. Use the rear camera, even lighting, and the settings below, then prepare the official size online. This guide answers the questions people actually search: how to take a passport photo with a phone, which iPhone settings to use, and whether a DIY phone photo is acceptable.

Upload From Phone

Can I take my own passport photo with my phone?

Yes. Many people take their own passport photo with a phone. Governments care about the final image — size, background, lighting, expression, and recency — not whether it was taken in a studio or on an iPhone.

A phone is usually sharp enough. Rejections more often come from shadows, a busy background, Portrait Mode blur, a tilted angle, or the wrong crop. Capture a clear head-and-shoulders portrait, then use a tool to size and clean it.

Always check the latest rules for your country before you submit. For a room and lighting setup (without camera menus), see the at-home guide. For size and background rules, see the requirements page.

How to take a passport photo with your iPhone

You do not need a photography app. The built-in Camera app is enough if you turn off beauty effects and hold the phone at eye level.

Use the rear camera on a timer rather than a close-up selfie. Selfie cameras distort faces at arm’s length and make the head look too large — a common reason DIY photos look unofficial.

  • Prop the iPhone at eye level (tripod, shelf, or a helper) about 1–1.5 meters (3–5 feet) away
  • Open Camera → Photo (not Portrait, not Cinematic)
  • Turn on the grid, turn off Live Photo if you prefer a still JPEG, and use a 3–10 second timer
  • Tap the face to focus and lock exposure; avoid HDR-looking filters or Photographic Styles that change skin color
  • Take 10–15 frames and pick the sharpest one with both eyes open

Best iPhone camera settings for a passport photo

These iPhone settings match what people look up as “iPhone settings for passport photo.” They reduce blur, distortion, and fake studio effects.

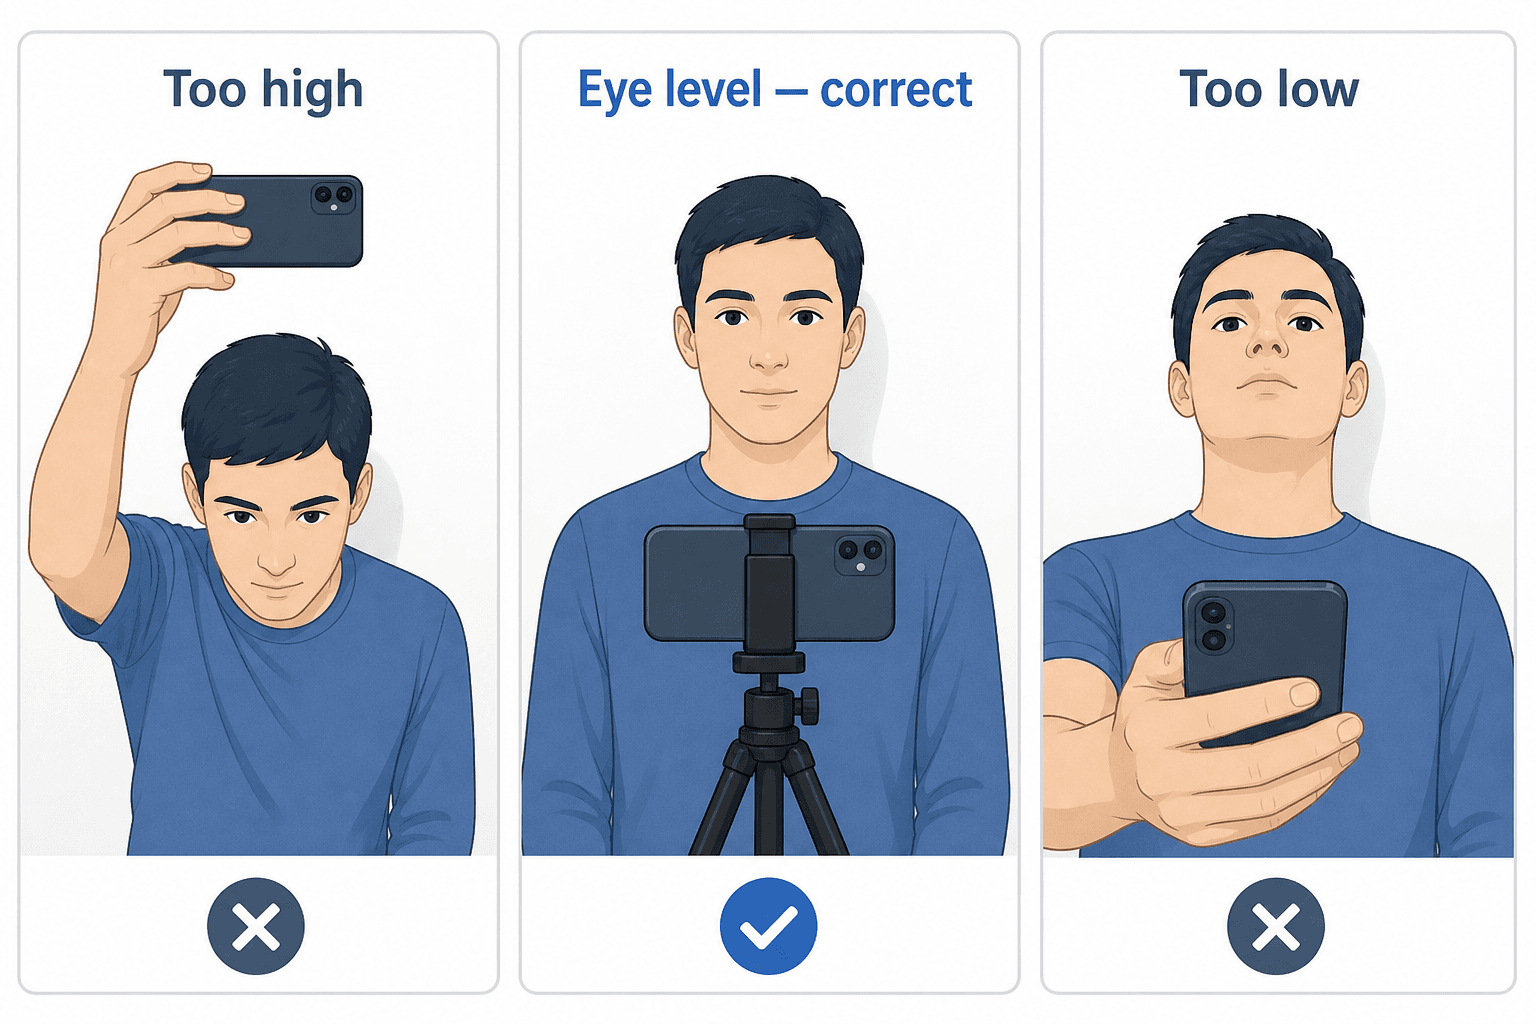
Diagram comparing phone camera angles for a passport photo: too high, eye level (correct), and too low
Hold the phone at eye level. Looking down or up distorts the face and is a common DIY mistake.

Turn on the grid

  • Settings → Camera → Grid → On
  • Center your face on the middle vertical line; keep the horizon (or wall edge) level
  • Leave a little space above the head so you can crop later

Use the timer — not a handheld selfie

  • In Camera, tap the arrow at the top, then the timer, and choose 3s or 10s
  • Stand still after the countdown; do not lean into the lens
  • A remote shutter or Apple Watch camera control also works if you have one

Turn Portrait Mode off

  • Stay on Photo mode. Portrait Mode blurs the background and can warp hair and ears
  • Official photos need a real, in-focus background you can replace later — not fake bokeh
  • Turn off any Beauty / Natural Light / Studio Light effects in third-party camera apps

Lighting on iPhone

  • Face a window in daytime so the screen is not a bright backlight behind you
  • Do not use the LED flash — it flattens skin and casts a hard shadow on the wall
  • If the photo looks yellow from indoor bulbs, move closer to daylight or use two lamps in front at 45°
  • Tap the brightest part of your face, then drag the sun slider slightly if the face is too dark

Resolution and format

  • Use the highest photo resolution available (not a cropped screenshot)
  • Upload the original from Photos — not a compressed WhatsApp or Messenger copy
  • HEIC is fine; AI Images Studio also accepts JPEG, PNG, and WebP

Android equivalent camera settings

Android menus differ by brand (Google, Samsung, Xiaomi, Oppo), but the same rules apply: Photo mode, grid on, timer on, no beauty blur.

  • Open Camera → Photo (not Portrait / Live focus / Bokeh)
  • Turn on Grid lines in Camera settings
  • Set a 3–10 second timer; use the rear camera
  • Turn off Beauty, Skin smooth, HDR+ look, and any AI scene filters
  • On Samsung, avoid “Portrait” and “Food”; stay on Photo. On Pixel, stay on Camera, not Portrait
  • Lock AE/AF by long-pressing the face if your camera supports it
  • Do not use the flash. Face a window or two front lamps instead

Lighting and background before you tap the shutter

Camera settings cannot fix a silhouette or a cluttered wall. Set the room first, then shoot.

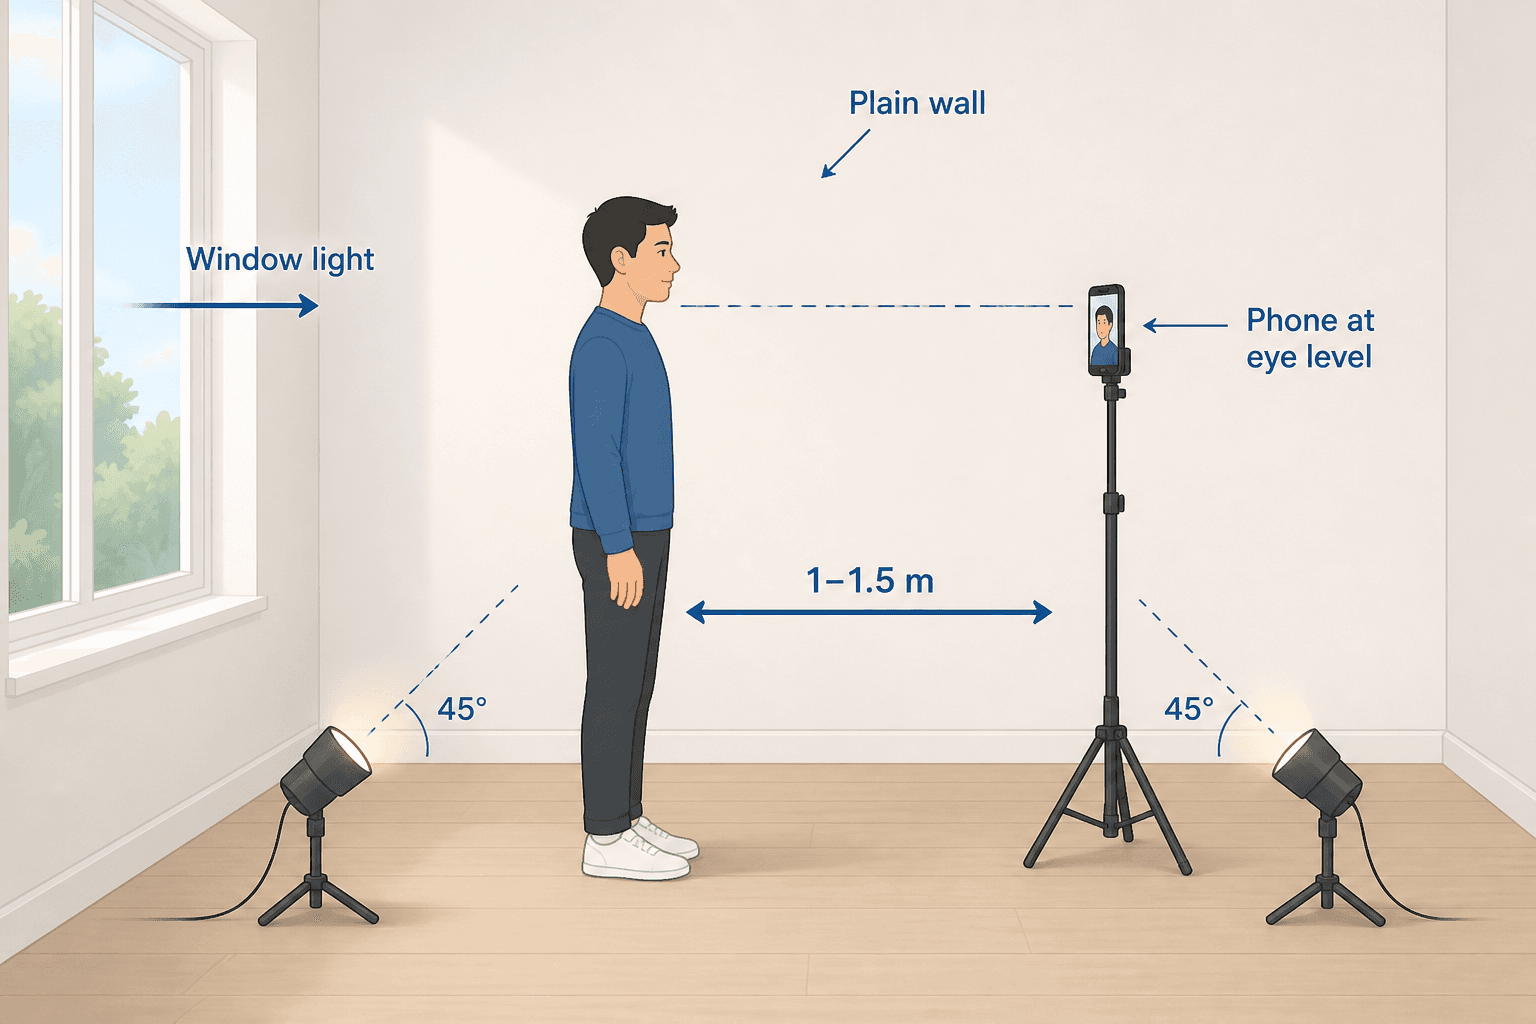
Diagram of a home lighting setup for a phone passport photo: window in front, plain wall behind, phone on a tripod at eye level
Face the window, keep a plain wall behind you, and place the phone on a tripod at eye level.

Lighting

  • Stand with a window in front of you, not behind you
  • If you shoot at night, use two lamps in front at 45° — not a single ceiling light
  • Watch for phone-screen glare on glasses; better to remove glasses if your country allows it

Background

  • A plain wall is best (white, off-white, or light grey)
  • Stand a little away from the wall so your shadow does not print onto it
  • Do not use digital background blur in the camera app

How to take a passport photo with your phone — step by step

  1. 1

    Choose a plain wall and even light

    Stand in front of a blank wall with a window in front of you. Avoid backlighting and overhead-only lamps.

  2. 2

    Set the phone at eye level

    Use a tripod, stack of books, or a helper. Stand about 1–1.5 meters (3–5 feet) from the rear camera so the frame shows your head and shoulders.

  3. 3

    Apply passport-friendly camera settings

    Photo mode, grid on, timer on, Portrait Mode off, no beauty filter, no flash. iPhone: Settings → Camera → Grid. Android: enable grid in Camera settings.

  4. 4

    Take 10–15 photos with a neutral expression

    Look at the lens, keep both eyes open, mouth closed, and head straight. Pick the sharpest frame with no blink and no heavy shadow.

  5. 5

    Upload the original file — not a screenshot

    Open aiimagesstudio.com on your phone or computer and upload the original image from your camera roll.

  6. 6

    Choose a passport size and crop

    Select a preset such as 35×45 mm or US 2×2 inches, then center your face in the crop frame.

  7. 7

    Let AI clean the background and lighting

    Background removal and lighting balance turn a home wall photo into a plain, even passport-style portrait.

  8. 8

    Download the HD file or a 4R print sheet

    Save a high-resolution photo for digital upload, or a 4R (4×6 in) sheet with multiple copies for printing.

Common phone passport photo mistakes

  • Holding the phone too low or too high instead of eye level
  • Standing too close, which widens the face on a wide-angle lens
  • Using Portrait Mode, Live Focus, or beauty filters
  • Submitting a screenshot or a compressed chat-app image
  • A window behind you that turns the face into a silhouette
  • Cutting off the top of the head or the shoulders in the frame

After you take the photo — prepare it online

The phone is only the camera. AI Images Studio handles the parts that are hard to do in Photos or Google Photos:

  • Plain background replacement for a passport-style look
  • Lighting cleanup to reduce wall and face shadows
  • Crop tools for official size presets
  • A printable 4R sheet with several copies on one 4×6 inch page

Official rules still apply

A well-taken phone photo does not automatically mean every government will accept it. Confirm size, background colour, glasses, and recency for your application.

Passport photo with a phone — FAQ

How to take a passport size photo in phone?

Use the rear camera at eye level, 1–1.5 meters away, with a plain wall and window light. Turn on the grid and timer, turn Portrait Mode off, then upload the original photo and crop it to your country’s size (for example 35×45 mm or 2×2 inches) in an online passport photo tool.

Can I take a passport photo with my phone?

Yes. Most modern phones capture enough resolution. Acceptance depends on the final photo meeting official rules — background, lighting, expression, and size — not on using a studio camera.

What are the iPhone settings for a passport photo?

Settings → Camera → Grid On. In Camera: Photo mode (not Portrait), timer 3s or 10s, flash off, no beauty filters. Use the rear camera on a tripod or shelf at eye level, then tap the face to focus.

How do I take a good passport photo with iPhone?

Face a window, stand in front of a plain wall, hold the iPhone at eye level with a timer, keep a neutral expression, and take several shots. Avoid Portrait Mode and flash. Then crop to the official size online.

Front camera or rear camera?

Rear cameras are usually sharper and less distorting. If you must use the front camera, hold it farther away and use a timer so you are not at arm’s length.

Can I do everything on my phone without a computer?

Yes. Open aiimagesstudio.com in your mobile browser, upload from the camera roll, and download the result to your phone.

What image format should I upload?

JPEG, PNG, WebP, and typical iPhone HEIC photos are fine. Use the original file rather than a screenshot or a compressed messaging-app download.

Have a phone photo ready?

Upload it now and turn it into a clean, printable passport-style image.